


Exploring the Creative Possibilities of Frame Averaging on iPhone
Originally published April 21, 2026. Updated October 1, 2026 for Even Longer 2.0.1.
I began exploring Even Longer earlier this year, and its Frame Averaging mode quickly caught my attention. The photographs in this article were made during my April trip to the Outer Banks of North Carolina. Since then, the app has been completely rebuilt. This update brings the explanation current while keeping those photographs as examples of what drew me to the app in the first place.
Frame Averaging blends a sequence of photographs into one image. Water can become smooth, moving clouds can stretch across the sky, and a busy scene can become quieter. We are choosing how movement appears over a period of time, rather than limiting ourselves to a single instant.

A Different Kind of Long Exposure
With a traditional long exposure, the shutter remains open while light accumulates. In bright conditions, we often use a neutral density filter to keep that exposure from becoming too bright. Frame Averaging works differently: the app combines many individually exposed frames. Extending the averaging time changes how motion is represented; it does not have the same brightness effect as leaving a traditional shutter open longer.
For a sharp stationary subject surrounded by softened movement, we want the phone to remain still. A tripod is the starting point. Frame Averaging can blend moving water, but it can also blend moving leaves, boats, or people. That can be useful or distracting, depending on what we want the photograph to communicate.
During my Outer Banks trip, I sometimes used a 5-stop neutral density filter, including for the Roanoke Lighthouse photograph and the iPhone infrared photograph of Rodanthe Bridge. A filter can help us lengthen the individual source exposures in bright light. It is a creative option, rather than a requirement for every Frame Averaging photograph.

Understanding the Controls
The familiar exposure terms still mean something useful. What requires a different way of thinking is the relationship between the exposure of each source frame and the time over which those frames are combined. We can understand the process in two layers, then consider the file we want to save.
Layer 1 Each Source Frame
ISO and shutter speed influence the exposure of an individual frame. Shutter speed also influences how much movement appears within that frame. White balance affects color, and focus determines what appears sharp. EV compensation lets us ask automatic metering for a brighter or darker exposure; it is not a separate light control in a fully manual exposure.
The iPhone 18 Pro and Pro Max add a physical variable aperture on the Main camera. A smaller opening admits less light and can change depth of field and the appearance of bright points of light. Aperture control applies to that camera, not to every lens on the phone. Earlier fixed-aperture models still benefit from the rebuilt app.
Layer 2 Movement Over Time
The blending mode determines how the source frames are combined. In Frame Averaging, total time describes the period represented by the finished photograph. Ten seconds of moving water and one minute of moving water can produce different interpretations, even if the source frames have similar brightness.
Shutter speed and total averaging time are different settings. A 30-second averaging session is not necessarily a sequence of 30-second source exposures. Nor can we reliably calculate frame count by dividing total time by shutter speed alone: readout and processing also take time. More frames can improve averaging, but the movement, its timing, and the appearance of each frame matter too.
Choosing the Output
Version 2.0 adds 48 MP Frame Averaging on supported 48 MP cameras. HEIC/JPEG are included; TIFF and Apple ProRAW require PRO. At 48 MP, metering is automatic, with EV compensation and white balance available. Format support depends on the lens and mode; the app can fall back to a compatible format.
Higher resolution gives us more pixels for cropping and printing, but it cannot guarantee more useful detail. Subject movement, focus, camera stability, and light still matter. For an important photograph, compare results at normal and maximum resolution rather than assuming the largest file will always be best.
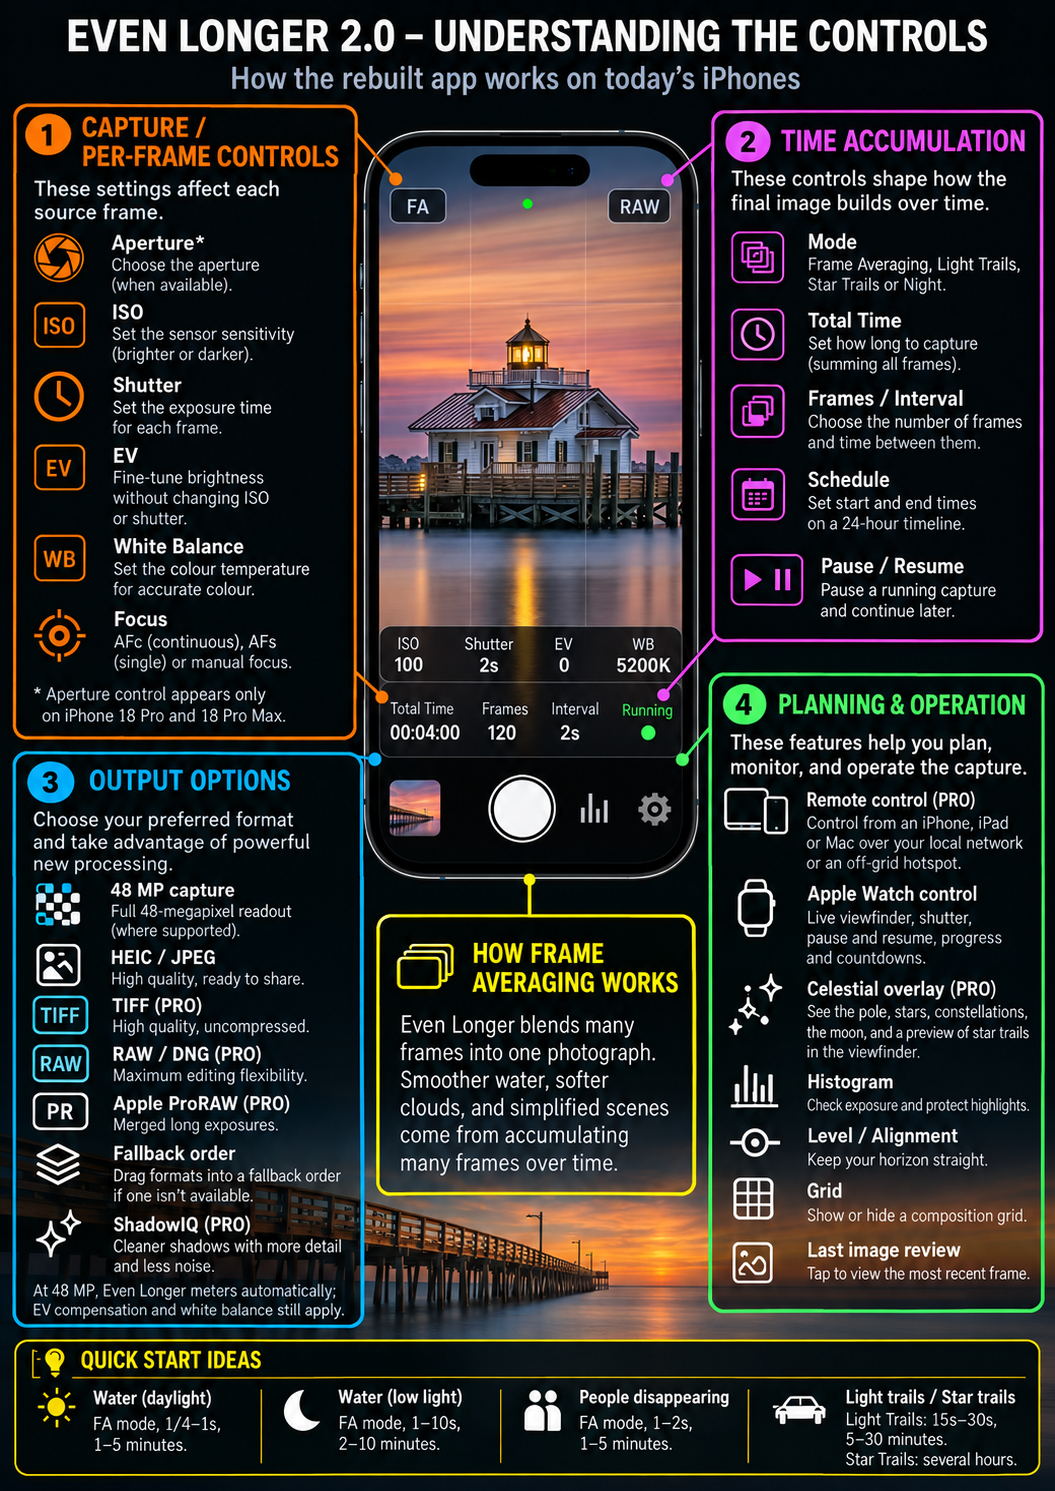 Even Longer 2.0 controls: each source frame, movement over time, and output choices. Shutter speed is different from total averaging time. Maximum-resolution operation uses automatic metering.
What the Rebuild Adds
The developer reports improved RAW shadows and additional noise reduction through ShadowIQ (PRO). These are promising claims to evaluate with comparison photographs, not results established by the April images. RAW offers editing flexibility, but it cannot restore clipped highlights or missing detail.
Remote control, scheduling, the intervalometer, interim saves, and the celestial overlay require PRO. Apple Watch control is included. Existing PRO purchases carry over. Version 2.0.1 fixes inconsistent ProRAW brightness and a manual-exposure crash in 2.0.
For our workshop, the first priority is learning to predict the appearance of moving water and clouds. The planning and remote features can wait until they serve something we want to make. Likewise, we can begin with HEIC or JPEG and consider PRO when we want its file formats or other features.
Which iPhones Can Use It?
The current App Store requirement is iOS 26 or later. The chart below covers common iPhone models from 12 through 18 Pro. It summarizes hardware eligibility, not a test of every lens/mode combination. Check the app’s device capabilities page and the actual saved file on your phone.
.png) Common iPhone 12 through 18 Pro models support core Frame Averaging with iOS 26 or later. 48 MP potential begins with 14 Pro and includes standard 15 and later models listed. Apple ProRAW requires Pro models and the app’s PRO upgrade. Physical aperture control applies to the 18 Pro/Pro Max Main cameras.
Common iPhone 12 through 18 Pro models support core Frame Averaging with iOS 26 or later. 48 MP potential begins with 14 Pro and includes standard 15 and later models listed. Apple ProRAW requires Pro models and the app’s PRO upgrade. Physical aperture control applies to the 18 Pro/Pro Max Main cameras.
¹ Requires iOS 26+. ² Requires a supported 48 MP camera in Frame Averaging; this does not mean every lens or zoom setting produces 48 MP. ³ Requires PRO and a supported lens/mode. Conventional RAW/DNG and Apple ProRAW are different formats; no ProRAW support does not necessarily mean no conventional RAW support. This chart is not an exhaustive list of every iPhone variant.
What Interests Me Most
The attraction remains the same as when I made these Outer Banks photographs. Frame Averaging can simplify a scene and draw attention toward shape, light, mood, and design. A shoreline becomes calmer. Reflections become painterly. Moving water and clouds become part of the composition.


Still Learning, Still Exploring
We do not have to master every control before beginning. Start with the phone on a tripod, choose Frame Averaging, and photograph the same scene over several different durations. Compare what changes in the water, clouds, and stationary subjects. Once we understand that relationship, we can explore individual exposure settings and output choices with a clearer purpose.
The rebuild gives us more possibilities to investigate. I look forward to exploring them and sharing further examples as I learn. What matters most is whether those choices help us make the photographs we envision.
[Keep the final existing photograph here.]

Thank You!
If you’d like occasional photography inspiration, learning resources, discounts, workshop news, and creative ideas, you can subscribe to my newsletter here.
As always, thanks for being here. I look forward to seeing you online, or better yet, in the field, in the coming months.
 ) to see how your blog looks